
LED Constellations (1st Grade)
Students design and build their own constellations. In this lesson, we focus on observing patterns (like geometric shapes, animals, or everyday objects – a house, a flower, a slice of pizza). Students are not required to memorize the constellations, but instead, make their own and describe the patterns they use.
Materials:
- 11″ x 17″ Black Construction Paper
- LED lights (10mm diffused white)
- Coin-cell batteries (3V)
- Blue Masking Tape
- Scissors (to cut tape)
- Medium Binder Clips (optional)

Lesson Outline
Prior to the lesson:
Students should have basic knowledge of the Sun-Earth-Moon System and the major constellations.
Step 1: Designing the Constellation
- Bring students to the carpet.
- Ask: “What have you been learning about in science?” Collect responses.
- If no one brings up a co
 nstellation, ask: “Have you been studying stars?” “What have you learned about stars?”
 - Possible responses: they make their own light, they form constellations.
- Draw a common constellation on the white board, such as the Big Dipper (Ursa Major). Or, show students images of constellations (large version / small version).
- Ask: “What patterns do you see in this constellation? It could be an object or a geometric shape. What patter could describe it?” Collect responses. Then add: “Do you think you could make your own constellation? What pattern or shape would you make?” Allow time for Think-Pair-Share.
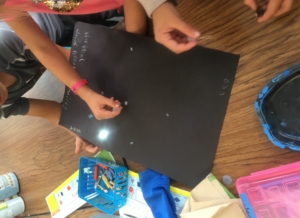
- Say: “I’m going to give each group of 4-6 students a black piece of paper and a white crayon. I want you to work together to design your own constellation.”
- Students return to desks and design their group constellations, consisting of 6-8 “stars.” Circulate and encourage cooperation and sharing of ideas. No more than 10 minutes.
Step 2: Introducing LEDs as stars
- Bring students back to the carpet.
- Briefly show them the different designs that other groups came up with. Discuss patterns. 1-2 minutes.
- Hold up an LED. Ask: “Has anyone ever seen an LED light before?” Draw a large LED on the white board. Emphasize the two legs attached to the light.
- Hold up a coin cell battery. Ask: “Has anyone ever seen battery like this before?” Draw a large circle on the white board. Emphasize the shape and texture of the battery.
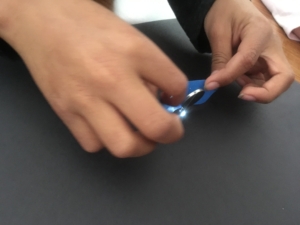
- Ask: “Do you think you could help me figure out how to light this light with the battery? I’m not sure I remember how to do it.” Collect responses. Don’t tell students how to do it.
- Say: “I’m going to give each of you an LED and a battery. This will be your star. Each of you will place your star on the black paper and connect the battery so it lights up.”
- Briefly show students how they might push the legs of the LED through the paper to keep it in place. They can connect it in other ways, too.
- Release students back to their groups and pass out LEDs and batteries.
- Tear 2-3″ pieces of blue tape and attach it to a desk at each table group (1st graders have a hard time tearing tape).
Step 3: Share out Constellations
- Bring students back to the carpet.
- Hang their constellations on the whiteboard.
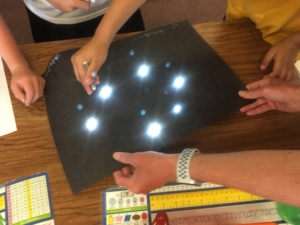
- Turn off the lights and facilitate a discussion about patterns.
- Batteries will last 2-3 days. Afterwards, keep the LEDs for “Make an Object that Uses Light” activity.
Performance Expectation. 1-ESS1-1: Use observations of the sun, moon, and stars to describe patterns that can be predicted.
Clarification Statement: Examples of patterns could include that the sun and moon appear to rise in one part of the sky, move across the sky, and set; and stars other than our sun are visible at night but not during the day.
Assessment Boundary: Assessment of star patterns is limited to stars being seen at night and not during the day.
Disciplinary Core Ideas. ESS1.A: The Universe and its Stars
- Patterns of the motion of the sun, moon, and stars in the sky can be observed, described, and predicted.
Crosscutting Concepts: Patterns: Patterns in the natural world can be observed, used to describe phenomena, and used as evidence.